Find the following line:
and delete it. THat’s simple at that!
Find the following line:
and delete it. THat’s simple at that!
If video card built by AMD/ATI,
If so, the Vari-Bright feature must be on. To fix this go to:
1. AMD Vision Engine Control Center (or AMD Catalyst Control Center)
2. Power
3. PowerPlay
4. Uncheck the “Enable Vari-Bright” option.
download the AMD Catalyst Control Center (AMD Vision Engine Control Center on other laptop) at the AMD/ATI website
here:
hxxp://support.amd.com/us/gpudownload/Pages/index.aspx
and that will fix your problem.
To Turn Adaptive Brightness On or Off in Power Options
1. Open the Advanced Power Settings for your power plan.
2. Expand Display and Enable display brightness, then set adaptive brightness to be turned on or off for when your computer is On battery and Plugged in. (see screenshot below)
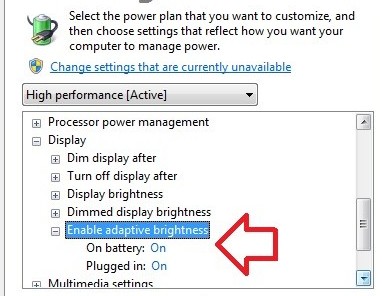
3. When finished, click on OK, and close the Power Options window.
Open with Computer view
To begin, right click on the File Explorer icon on the taskbar to bring up the Jump List. Then, right click on the File Explorer command towards the bottom of the list and select the Properties command from the context menu. This process is illustrated in Figure B.
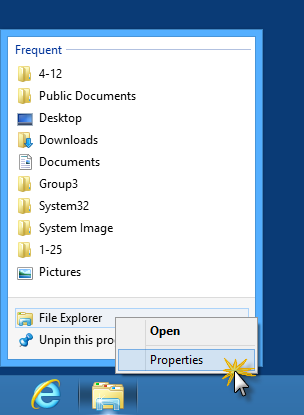
When you Jump List appears, right click on the File Explorer command and select Properties.
When you see the Properties dialog box, select the text in the Target text box, as shown in Figure C. Then, replace it with this command line:
%windir%\explorer.exe ::{20D04FE0-3AEA-1069-A2D8-08002B30309D}To complete the operation, just click OK.
WINKEY – Open/close the Start Screen.
WINKEY + C – Open the Charms menu, which gives you options for Search, Share, Start, Devices, and Settings.
WINKEY + D – Switch to the classic Windows Desktop.
WINKEY + F – Search for Files via the Search charm.
WINKEY + I – Opens the Settings pane, which gives you current app settings, along with options for Network, Volume, Brightness, Notifications, Power, and the ability to change more PC settings.
WINKEY + L – Locks your PC and returns you to the lock screen.
WINKEY + O – Changes screen orientation (portrait/landscape) for tablet/slate PCs.
WINKEY + P – Opens the Second Screen panel so that you can choose how content on a projector or additional screen is displayed.
WINKEY + Q – Search within Apps via the Search charm.
WINKEY + Z – Opens the App Bar in a Windows Store app.
Also, when at the Start Screen, you can start searching for apps and programs just by typing. When searching, you can always change your search context (Apps, Files, Settings, search within apps) by clicking or tapping on the name of the item on the right-hand side.
Instructions
1 Remove the cable that is attached to the “Internet” port on the rear of your DSL or cable modem.
2 Plug the Ethernet cable into the “Internet” port on the modem and plug the other end of the cable into the “Internet” port on the rear of the D-Link router. Attach the power adapter to the port on the rear of the router and plug the adapter’s cord into a outlet.
3 Remove the power cord from your modem and wait 10 seconds before plugging it back in. This will reinitialize your modem and force it to establish a connection to the D-Link router. Your router will immediately begin distributing a wireless network with the “D-Link” network name.
4 Connect your computer to one of Ethernet ports on the rear of the router and open a Web browser. Type “http://192.168.0.1” into the address bar and press “Enter.” Enter “admin” into the username field and type “admin” again into the password field. Click “OK” to open the wireless configuration page. Click “Wireless Security Setup Wizard” to create a wireless password for your router’s network. Click “Apply” to save the changes to the router’s settings.
Windows – PuTTyPuTTy: PuTTy is a free application that can be downloaded from chiark.greenend.org.uk
1.In PuTTY, under Session, enter your Domain Name as the Host Name
2.Under SSH, choose 2 from Preferred SSH Protocol Version
3.Under SSH -> Auth in PuTTY, you will need to specify where your private key can be found. Remember this is where you saved the private key on your local computer. Click Browse to locate the file on your computer.
4.If you wish to have your username automatically sent to the server when connecting, under Connection -> Data in PuTTY, you will see a field for “Auto-login username”. Type your account username there.
5.Save your settings to be used in future sessions – Under Sessions, type a name (such as “my site”) in the Saved Sessions box and click Save.
From the panel
Choose ‘User Tools/Counter’ –> System Settings –> Tray Paper Settings –> Change Tray 1
– 34″ for E
– 36″ for D
1. Boot your PC and enter your password.
2. Press Win-X.
3. In the pop-up menu that appears, click Command Prompt (Admin).
4. In the command prompt, type control userpasswords2, then press Enter.
5. In the User Accounts dialog that appears, uncheck the box marked Users must enter a user name and password to use this computer.
6. Click OK, then confirm the automatic sign-in option by entering your password (twice).
7. Reboot.
“spooler subsystem app stopped working…” and found solution that may help you to fix your case.
Somehow vista turn off LDP port after installing new printer driver and leaves only Internet client port only. That why the printer spooler service failed to start. Solution is:
1. Go to Programs and Features in Control panel > click Turn Windows features on or off
2. click + sign of Print services
3. Select LPD and LPR. You should remove Internet Printing Client. > restart your PC to ensure there is no error of spooler service.
4. Add your printer driver again.
Use this:
query_posts($query_string.”&posts_per_page=-1″)
By using $query_string you are keep the original query (all posts in a particular month), and then adding the posts_per_page parameter to it. If you don’t add that, what you’re doing is replacing the original query for a new query with whatever parameters you use.
To delete a user profile
You must be logged on as an administrator or a member of the Administrators group in order to complete this procedure. If your computer is connected to a network, network policy settings may also prevent you from completing this procedure.
1. Open System in Control Panel.
2. On the Advanced tab, under User Profiles, click Settings.
3. Under Profiles stored on this computer, click the user profile you want to delete, and then click Delete.
Note
• To open System, click Start, click Control Panel, click Performance and Maintenance, and then click System.
Installin WAMP Server to run PHP:
1.Goto www.wampserver.com and download WAMP Server.
2.Just install it like other softwares by just clicking next next…
3.Now go to START menu of windows and start wampserver.
Generally, the path is Start -> WapmServer -> start WampServer
4.Open your web browser and type http://localhost (or http://127.0.0.1 )
If you see a default WampServer home page, you installation is success.
5.Now put your php code in www folder in your wamp installation directory.
Usually this is C:\wamp\www
6.Now type http://localhost/filename.php in your browser. (where filename is your php file name)
It will execute your php code. Be sure to have not start up when Windows starts, you can always turn it on manually when you need it.
The error message came from MS/J [Couldn’t open the clipboard to get a
format list]
The fix: MDL Unload Clipbrd
Stuck in Viewport zoom
How to toggle off the zoom when in a viewport in paperspace?
Typically, double click along the view port to get out of the zoom mode.
However, sometimes it gets zoomed in too closely and can not get a hold of the view port.
Solution: type ‘ps’ will get it back to Paper space. ‘ms’ gets back to viewport.
How To Uninstall Windows Presentation Foundation Plugin In Firefox
The Security patch released: Microsoft Security Bulletin MS09-054 – Critical: Cumulative Security Update for Internet Explorer (974455)
Will stop the exploit of this Firefox vulnerability
But from reading more about this issue, and I note that I had to go to Google to find clearer information to do this)
It would seem that no one wants this installed in Firefox in the first place !
And not only that, but it was an automatic install by Microsoft in February this year (imagine that)
Here’s the uninstall procedure for Firefox users:
Note: Windows 7 users just need to uninstall the Firefox pluggin normally
Close all Firefox browsers
Start > Run > c:\Windows\Microsoft.NET\Framework\v3.5\Windows Presentation Foundation
Right click on NPWPF.dll, and rename it to NPWPF.OLD
Restart your computer
Start > Run > Regedit
Expand: HKEY_LOCAL_MACHINE\SOFTWARE\MozillaPlugins
Right click on: @microsoft.com/WPF,version=3.5
Select “Export”
Give it a name like “BadPluggin” in the Save Box, then select Save button
Right click on: @microsoft.com/WPF,version=3.5 again
Select “Delete”
Restart your computer
Alternative content
Make sure login in the page:
zp-core/admin.php
Otherwise from the Log, says a guest login failed.
Right Click on a blank space in the taskbar. “Uncheck” the Lock the Taskbar. Then simply drag the taskbar to the bottom (or top) of your screen. Be sure to “Lock the Taskbar” again
After the issue occurs, please end the “explorer.exe” process in Task Manager and restart “explorer.exe” and check how it works.